Auth.js (next-auth) setup
This approach requires you to self-host, because you would need a global context and a middleware for it to work.
Overview
Auth.js (previously known as next-auth) is a popular authentication library for Next.js applications. It provides a flexible and extensible way to handle authentication, including support for various providers, session management, and more. This guide will walk you through setting up Auth.js in your Plasmic project.
Refer to this repository if you already have a Next.js codebase connected to your Plasmic project. It contains a working example of how to set up Auth.js with Plasmic in Loader mode. Alternatively you can also use it in the codegen mode — see this example.
Prerequisites
- A Plasmic project. Make sure it has at least one published version.
- GitHub account
- Vercel account or any other hosting provider that supports Next.js
- Auth.js secret key
- Google OAuth credentials. Use this link to create a new Oauth 2.0 Client ID using the
Create credentialsbutton at the top of the page.
You can use any auth provider that is supported by Auth.js. In this example, we will use Google as our auth provider.
To get the Auth.js secret key, you can use one of the following methods:
- Using the command line:
npx auth secret - Online: Go to https://auth-secret-gen.vercel.app/ and hit generate.
Setup
Step 1: Fork the Plasmic Next.js next-auth template
Click the button below. It will take you to Vercel, where you would be able to copy our Next.js template into a new GitHub repository in your account, and deploy it.
After clicking the button you will be prompted to log in into your account if you haven’t already, and then you will be able to fill in the details for your new project:

Pick a Git Scope, fill in the repository name, make sure that privacy toggle is enabled, so that your repository is not public and click the Create button. It will then prompt you to fill in your environment variables, and then create a deployment pointing to our default example Plasmic project.
Step 2: Connect the codebase to your Plasmic project
Go to your GitHub account, find the new repository you just created, and edit the plasmic-init.ts file to point to your own Plasmic project. Learn more about how to do that in the Plasmic Next.js setup guide.
Commit the changes to your repository, and it will automatically trigger a new deployment on Vercel.
Step 3: Configure app host in Plasmic Studio
Refer to this guide to connect your Plasmic project to your deployed app. You can find the app host URL in the Vercel dashboard, and then refer to this guide to configure the app host in the studio.
How SSR and SSG are implemented
We are using two separate catchall routes in this example:
/app/[[...catchall]]/page.tsx- SSG (Static Site Generation) for public pages/app/app/[[...catchall]]/page.tsx- SSR (Server Side Rendering) for pages that require authentication (i.e. protected pages)
The /[[...catchall]]/page.tsx file is responsible for statically generating every public route. At build time, its generateStaticParams function calls PLASMIC.fetchPages() to pull the full list of Plasmic pages, filters out any paths that start with /app (protected pages), and returns data for the remaining public ones.
Next.js prerenders those pages and stores them in its cache, so they can be served quickly without recomputing static data on each request. Any sections that rely on user-specific authentication still render on the client once the page has loaded.
We do not recommend using SSG for protected pages, because the authentication data is not available at the build time. Instead, we use SSR for protected pages. The template for protected pages contains logic to fetch the authentication data on the server side, and then pass it to the page as props.
// ...const session = await auth();const componentData = await fetchComponentData(params?.catchall);// ...return (<SessionProvider session={session}>// ...
This way, the page is rendered with the authentication data already available, and there is no need to wait for the client side to load.
How to authenticate from Plasmic Studio
You are able to view the authenticated state of the app in your Plasmic Studio by simply logging in to your app from another browser tab, while making sure it is currently connected through the app host. All of the artboards are rendering as the app host domain, so if you are logged in, then the artboard will show the authenticated state.
Attempting to authenticate directly from within Plasmic Studio will not work, because the OAuth flow requires a redirect to the auth provider’s page.
Important Note: Make sure that your app host is not connected to the production version of the app when you try to log in. In production, cookies are intentionally not configured for cross-domain usage to enhance security and prevent phishing attacks. For more details, see the configuration policy.
Route protection
Suggested - using middleware
Example template is pre-configured to protect pages using Next.js middleware.
All pages under the /app route are protected, and if the user is not logged in they will be redirected to the /login page when they try to access a protected page.
Similarly the user will be redirected from the /login page to the /app page if they are already logged in.
You can change the default behavior by modifying the middleware.ts file.
If you want to change the base protected URL from /app to something else (let’s say /dashboard) you would need to:
- Change the
protectedRouteBasevariable inconfig.tsfile:
const protectedRouteBase = '/dashboard';
- Rename the
/app/appfolder to/app/dashboard.
For more details read the official guide for protecting routes using Auth.js.
Using Conditional Guard component
If you want to prevent the user from accessing a page on the client side, without using middleware, you can use the Conditional Guard element in Plasmic Studio:
-
Wrap your page with the
Conditional Guardelement. -
Use something like this as a dynamic value for Condition field:
$ctx.auth.status === 'authenticated'. -
Add the “On condition false” interaction to redirect the user to the
/loginpage.
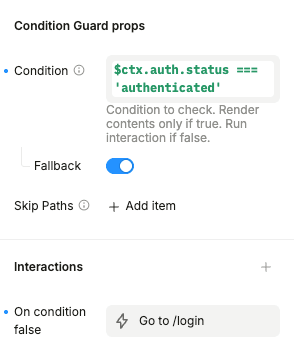
Now if the user is not logged in the component will redirect them to the /login page.