Get started with Next.js
You must first create a project in Plasmic.
To view this quickstart with all the IDs and token placeholders replaced with real values, open your project in Plasmic Studio and press the “Code” button in the top toolbar.
Overview
This covers integrating Plasmic into your existing Next.js codebase.
Want to quickly generate a new codebase with Plasmic already integrated? Use create-plasmic-app instead.
Alternatively you can just press the Publish button in your project to push a new repo to GitHub!
Want to generate source code into your codebase (warning: advanced)? Learn about codegen.
Installation
npm install @plasmicapp/loader-nextjs# or yarn add @plasmicapp/loader-nextjs
Initialization
Initialize Plasmic with the project ID and public API token. Define this in its own module to make it available globally.
import { initPlasmicLoader } from "@plasmicapp/loader-nextjs/react-server-conditional";export const PLASMIC = initPlasmicLoader({projects: [{id: "PROJECTID", // ID of a project you are usingtoken: "APITOKEN" // API token for that project}],// Fetches the latest revisions, whether or not they were unpublished!// Disable for production to ensure you render only published changes.preview: true})
To find your project’s ID and public API token: open the project in Plasmic Studio.
The project ID is in the URL, like: https://studio.plasmic.app/projects/PROJECTID.
The public API token can be found by clicking the Code toolbar button.
For React Server Components, you’ll also need to define a plasmic-init-client.tsx.
'use client';import { PlasmicRootProvider } from '@plasmicapp/loader-nextjs';import { PLASMIC } from './plasmic-init';// You can register any code components that you want to use here; see// https://docs.plasmic.app/learn/code-components-ref/// And configure your Plasmic project to use the host url pointing at// the /plasmic-host page of your nextjs app (for example,// http://localhost:3000/plasmic-host). See// https://docs.plasmic.app/learn/app-hosting/#set-a-plasmic-project-to-use-your-app-host// PLASMIC.registerComponent(...);/*** ClientPlasmicRootProvider is a Client Component that passes in the loader for you.** Why? Props passed from Server to Client Components must be serializable.* https://beta.nextjs.org/docs/rendering/server-and-client-components#passing-props-from-server-to-client-components-serialization* However, PlasmicRootProvider requires a loader, but the loader is NOT serializable.*/export function ClientPlasmicRootProvider(props: Omit<React.ComponentProps<typeof PlasmicRootProvider>, 'loader'>) {return <PlasmicRootProvider loader={PLASMIC} {...props}></PlasmicRootProvider>;}
Auto load all Plasmic pages
To automatically render all Plasmic-defined pages at the routes specified in Plasmic, create a Next.js catch-all page.
Create either:
app/[[...catchall]]/page.tsxif you want the/route to render the corresponding Plasmic page (you must remove any existingpages/index.tsx), orapp/[...catchall]/page.tsxotherwise (your Plasmic project must not have a page whose route is/—change the route to something else if you do).
In all cases, the Plasmic page will only be there if there is no existing page for that route.
To output Plasmic metadata (including dynamic values), define generateMetadata() in the same route file:
import { ComponentRenderData, PlasmicComponent } from '@plasmicapp/loader-nextjs';import { Metadata, ResolvingMetadata } from 'next';import { notFound } from 'next/navigation';import { PLASMIC } from '../../plasmic-init';import { ClientPlasmicRootProvider } from '../../plasmic-init-client';interface Params {catchall: string[] | undefined;}interface LoaderPageProps {params: Promise<Params>;searchParams: Promise<Record<string, string | string[]>>;}// Use revalidate if you want incremental static regeneration.export const revalidate = 60;export async function generateStaticParams(): Promise<Params[]> {const pageModules = await PLASMIC.fetchPages();return pageModules.map((mod) => {const catchall = mod.path === '/' ? undefined : mod.path.substring(1).split('/');return {catchall};});}async function getPageData(params: Promise<Params>): Promise<{ componentData?: ComponentRenderData }> {const catchall = (await params).catchall;const pagePath = catchall ? `/${catchall.join('/')}` : '/';const componentData = await PLASMIC.maybeFetchComponentData(pagePath);if (!componentData || componentData.entryCompMetas.length === 0) {return {};}return { componentData };}export async function generateMetadata({ params, searchParams }: LoaderPageProps,parent: ResolvingMetadata): Promise<Metadata> {const { componentData } = await getPageData(params);if (!componentData) {return parent as Promise<Metadata>;}const pageMeta = componentData.entryCompMetas[0];const metadata = await PLASMIC.unstable__generateMetadata(componentData, {params: pageMeta.params ?? {},query: await searchParams});return { ...(await parent), ...metadata };}export default async function PlasmicLoaderPage({ params, searchParams }: LoaderPageProps) {const { componentData } = await getPageData(params);if (!componentData) {notFound();}const pageMeta = componentData.entryCompMetas[0];const query = await searchParams;return (<ClientPlasmicRootProviderprefetchedData={componentData}pageRoute={pageMeta.path}pageParams={pageMeta.params}pageQuery={query}><PlasmicComponent component={pageMeta.displayName} /></ClientPlasmicRootProvider>);}
Notes:
- See Next.js’s documentation on Revalidating Data to use incremental static regeneration.
- If your project has dynamic pages and you are using SSG, you will need to manually add your dynamic routes to
generateStaticParams. Learn more about dynamic pages.
Render a single Plasmic page or component
Note: You can instead auto-load all Plasmic pages at the correct routes (recommended) rather than manually loading individual pages—see previous section.
In the App Router, fetch the design in a Server Component page.
For example, to render a page: add a file under app/, named for your desired route, with the following code.
COMPONENT_OR_PAGEROUTE refers to the name of the page or component that you want to render, such as Winter22LandingPage.
If it’s a page, you can also use the route you assigned the page in Plasmic, like /landing.
// This page will show up at the route /mypageimport { PlasmicComponent } from '@plasmicapp/loader-nextjs';import { Metadata, ResolvingMetadata } from 'next';import { PLASMIC } from '../../plasmic-init';import { ClientPlasmicRootProvider } from '../../plasmic-init-client';interface LoaderPageProps {searchParams: Promise<Record<string, string | string[]>>;}// Using incremental static regeneration, will invalidate this page// after 300s (no deploy webhooks needed)export const revalidate = 300;async function getPageData() {const componentData = await PLASMIC.fetchComponentData('COMPONENT_OR_PAGEROUTE');const compMeta = componentData.entryCompMetas[0];return { componentData, compMeta };}export async function generateMetadata({ searchParams }: LoaderPageProps,parent: ResolvingMetadata): Promise<Metadata> {const { componentData, compMeta } = await getPageData();const metadata = await PLASMIC.unstable__generateMetadata(componentData, {params: compMeta.params ?? {},query: await searchParams});return { ...(await parent), ...metadata };}// Render the page or component from Plasmic.export default async function MyPage({ searchParams }: LoaderPageProps) {const { componentData, compMeta } = await getPageData();const query = await searchParams;return (<ClientPlasmicRootProviderprefetchedData={componentData}pageRoute={compMeta.path}pageParams={compMeta.params}pageQuery={query}><PlasmicComponent component={compMeta.displayName} /></ClientPlasmicRootProvider>);}
Notes:
- Here we are using incremental static regeneration with the
revalidateoption, so no deploy webhooks needed. - See Revalidating Data for more revalidation options.
Adding custom code components
Let your Plasmic Studio users drag/drop and visually manipulate your own custom React components! Learn more.
Step 1
Create a simple example React component:
import * as React from 'react';export interface HelloWorldProps {children?: React.ReactNode;className?: string;verbose?: boolean;}export function HelloWorld({ children, className, verbose }: HelloWorldProps) {return (<div className={className} style={{ padding: '20px' }}><p>Hello there! {verbose && 'Really nice to meet you!'}</p><div>{children}</div></div>);}
Step 2
Add the following to your plasmic-init-client.tsx to register it:
import { PLASMIC } from './plasmic-init';import { HelloWorld } from './components/HelloWorld';// ...PLASMIC.registerComponent(HelloWorld, {name: 'HelloWorld',props: {verbose: 'boolean',children: 'slot'}});
Step 3
Create a host page at route /plasmic-host:
import * as React from 'react';import { PlasmicCanvasHost } from '@plasmicapp/loader-nextjs';import '../../plasmic-init-client';export default function PlasmicHost() {return <PlasmicCanvasHost />;}
Step 4
Start your app:
npm run dev
And check that you see a confirmation message at http://localhost:3000/plasmic-host .
Step 5
Open https://studio.plasmic.app, click the menu for the current project, select “Configure project,” and set it to http://localhost:3000/plasmic-host .

Step 6
Re-open this project (or reload this tab) to see your component listed in the insert menu!
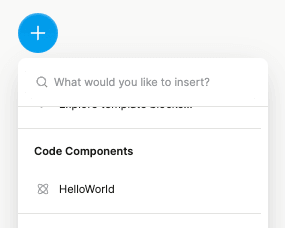
Later, after you deploy the route to production, update the project to use your production host URL instead,
such as https://my-app.com/plasmic-host.
This way, other members of your team
(who can’t access your localhost dev server) will be able to open and edit the project in
Plasmic.
(Again, the /plasmic-host route itself is a special hidden route not meant for humans to visit; it is only for Plasmic Studio to hook into.)
Note: If you run next export rather than (say) hosting on Vercel, then by default it exports with .html suffixes (unlike the routes in the dev server), so you would get /plasmic-host.html in production. Either include the .html in your host URL, or suppress exporting with .html with trailingSlash: true in your next.config.js.
Using Plasmic components in a shared layout
Shared layouts are useful for components such as navigation headers and footers.
For example, you might have a NavHeader component designed in Plasmic and want to show it on all pages.
Shared layouts can be defined in layout components. You can use Plasmic components in layouts just like in any other React Server Component.
Example with NavHeader component:
import { PLASMIC } from '../plasmic-init';import { ClientPlasmicRootProvider } from '../plasmic-init-client';export default async function SharedLayout({ children }) {const plasmicData = await PLASMIC.fetchComponentData('NavHeader');return (<html lang="en"><body><ClientPlasmicRootProvider prefetchedData={plasmicData}><PlasmicComponent component="NavHeader" />{children}</ClientPlasmicRootProvider></body></html>);}
There’s much more to explore!
For example:
- Explore what you can do with code components.
- Render different variants of your pages/components.
- Override the content or props in your design.
- Add hooks for state and behavior to any component.
- (Advanced) Use Plasmic as a UI builder for developers.
Continue learning in the full docs.