Get started with Shopify Hydrogen
You must first create a project in Plasmic.
To view this quickstart with all the IDs and token placeholders replaced with real values, open your project in Plasmic Studio and press the “Code” button in the top toolbar.
Overview
Note: This is for Hydrogen 1.0, a React server component based framework. For Hydrogen 2.0, see the Remix quickstart.
This covers integrating Plasmic into your existing Hydrogen codebase.
Note: If you’re deploying to Shopify Oxygen, then you’ll need to use codegen—see build-time codegen. See example Hydrogen app.
Installation
npm install @plasmicapp/loader-react# or yarn add @plasmicapp/loader-react
Initialization
Initialize Plasmic with the project ID and public API token. Define this in its own module to make it available globally.
import { initPlasmicLoader } from "@plasmicapp/loader-react";export const PLASMIC = initPlasmicLoader({projects: [{id: "PROJECTID", // ID of a project you are usingtoken: "APITOKEN" // API token for that project}],// Fetches the latest revisions, whether or not they were unpublished!// Disable for production to ensure you render only published changes.preview: true})
To find your project’s ID and public API token: open the project in Plasmic Studio.
The project ID is in the URL, like: https://studio.plasmic.app/projects/PROJECTID.
The public API token can be found by clicking the Code toolbar button.
Plasmic helpers
We need to define a few Plasmic helpers for you to use in your Hydrogen app.
usePlasmicData()
We can use Hydrogen’s useQuery() hook to build a React hook for fetching Plasmic data. Let’s create a reusable hook in lib/plasmic.tsx:
import { extractPlasmicQueryData, PlasmicComponent, PlasmicRootProvider } from '@plasmicapp/loader-react';import { useQuery } from '@shopify/hydrogen';import { PLASMIC } from '../plasmic-init';export function usePlasmicData(components: string[]) {const { data, error } = useQuery([`plasmic`, ...components], async () => {const plasmicData = await PLASMIC.maybeFetchComponentData(...components);if (!plasmicData) {return null;}const queryData = await extractPlasmicQueryData(<PlasmicRootProvider loader={PLASMIC} prefetchedData={plasmicData}><PlasmicComponent component={plasmicData.entryCompMetas[0].name} /></PlasmicRootProvider>);return { plasmicData, queryData };});if (error) {throw error;}return data;}
We can then use this hook in your server components to fetch the necessary data to pass into <PlasmicRootProvider />.
Plasmic client components
Various Plasmic components need to be re-exported as client components so they can be properly used from your server components:
import { PlasmicCanvasHost, PlasmicComponent, PlasmicRootProvider } from '@plasmicapp/loader-react';import { PLASMIC } from '../plasmic-init';export const ClientPlasmicCanvasHost = PlasmicCanvasHost;export const ClientPlasmicComponent = PlasmicComponent;// Hydrogen doesn't allow passing PLASMIC from a server to client component, so we omit// that prop from `ClientPlasmicRootProviderProps` and instead pass it in from here.export function ClientPlasmicRootProvider(props: Omit<React.ComponentProps<typeof PlasmicRootProvider>, 'loader'>) {return <PlasmicRootProvider loader={PLASMIC} {...props} />;}
Render a single Plasmic page or component
Using the hook and utilities above, you can render a specific Plasmic page or component like so:
For example, to render a page: add a file under src/routes/, named for your desired route, with the following code:
COMPONENT_OR_PAGEROUTE refers to the name of the page or component that you want to render, such as Winter22LandingPage.
If it’s a page, you can also use the route you assigned the page in Plasmic, like /landing.
// This page will show up at the route /mypageimport { usePlasmicData } from '../lib/plasmic';import { ClientPlasmicComponent, ClientPlasmicRootProvider } from '../components/plasmic-helpers.client';// Render the page or component from Plasmic.export default function MyPage() {const { plasmicData, queryData } = usePlasmicData(['COMPONENT_OR_PAGEROUTE']);return (<ClientPlasmicRootProvider prefetchedData={plasmicData} prefetchedQueryData={queryData}><ClientPlasmicComponent component="COMPONENT_OR_PAGEROUTE" /></ClientPlasmicRootProvider>);}
Auto load all Plasmic pages
You can also add a catch-all route that would render any page that you created in Plasmic. Let’s say, we want to do so at /pages/*. You need to create a parameterized route file, say, at src/routes/pages/[handle].server.tsx, and do this:
import { HydrogenRouteProps } from '@shopify/hydrogen';import { usePlasmicData } from '../../lib/plasmic';import { ClientPlasmicComponent, ClientPlasmicRootProvider } from '../../lib/plasmic-helpers.client';export default function PlasmicLoaderPage({ params }: HydrogenRouteProps) {const { handle } = params;// If the url is /pages/hello, then `handle` will be "hello". We convert this into the page path// that we used in Plasmic for the corresponding page.const data = usePlasmicData([`/${handle}`]);if (!data) {return your404Page();}const { plasmicData, queryData } = data;return (<ClientPlasmicRootProvider prefetchedData={plasmicData} prefetchedQueryData={queryData}><ClientPlasmicComponent component={plasmicData.entryCompMetas[0].name} /></ClientPlasmicRootProvider>);}
Adding custom code components
Let your Plasmic Studio users drag/drop and visually manipulate your own custom React components! Learn more.
Step 1
Create a simple example React component:
import * as React from 'react';export interface HelloWorldProps {children?: React.ReactNode;className?: string;verbose?: boolean;}export function HelloWorld({ children, className, verbose }: HelloWorldProps) {return (<div className={className} style={{ padding: '20px' }}><p>Hello there! {verbose && 'Really nice to meet you!'}</p><div>{children}</div></div>);}
Step 2
Add the following to your src/plasmic-init.ts to register it:
import { HelloWorld } from './components/HelloWorld';// ...export const PLASMIC = initPlasmicLoader(/* ... */);PLASMIC.registerComponent(HelloWorld, {name: 'HelloWorld',props: {verbose: 'boolean',children: 'slot'}});
Step 3
Create a host page at route /plasmic-host:
import { ClientPlasmicCanvasHost } from '../lib/plasmic-helpers.client';import { PLASMIC } from '../plasmic-init';export default function PlasmicHost() {return PLASMIC && <ClientPlasmicCanvasHost />;}
Step 4
Start your app:
npm run dev
And check that you see a confirmation message at http://localhost:3000/plasmic-host .
Step 5
Open https://studio.plasmic.app, click the menu for the current project, select “Configure project,” and set it to http://localhost:3000/plasmic-host .

Step 6
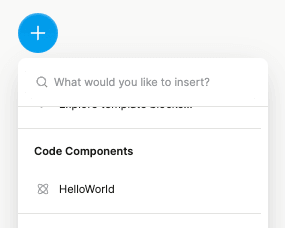
Re-open this project (or reload this tab) to see your component listed in the insert menu!
Later, after you deploy the route to production, update the project to use your production host URL instead,
such as https://my-app.com/plasmic-host.
This way, other members of your team
(who can’t access your localhost dev server) will be able to open and edit the project in
Plasmic.
(Again, the /plasmic-host route itself is a special hidden route not meant for humans to visit; it is only for Plasmic Studio to hook into.)
There’s much more to explore!
For example:
- Explore what you can do with code components.
- Render different variants of your pages/components.
- Override the content or props in your design.
- Add hooks for state and behavior to any component.
- (Advanced) Use Plasmic as a UI builder for developers.
Continue learning in the full docs.