Auth integration (deprecated)
Plasmic Auth is deprecated. For new apps, use any authentication provider that fits your stack. For example, see Auth.js (next-auth) setup or the plasmic-prisma-starter.
Self-hosted Plasmic Auth
This page is only required if you self-host OR want to integrate a custom auth provider. If you use Plasmic Auth with Plasmic Hosting, you do NOT need any code set up.
Usage
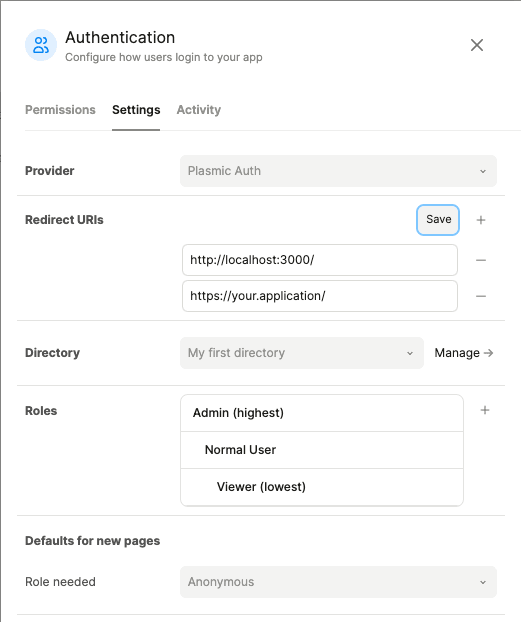
To use Plasmic Auth, you need to pass in the authRedirectUri prop to PlasmicRootProvider:
import * as React from 'react';import { PlasmicComponent, PlasmicRootProvider } from '@plasmicapp/loader-nextjs';import { PLASMIC } from '../plasmic-init';import { usePlasmicAuth } from '@plasmicapp/auth-react';export default function PlasmicLoaderPage() {return (<PlasmicRootProviderloader={PLASMIC}prefetchedData={plasmicData}prefetchedQueryData={queryCache}pageParams={pageMeta.params}authRedirectUri={'YOUR_REDIRECT_URI'}><PlasmicComponent component={pageMeta.displayName} /></PlasmicRootProvider>);}
The REDIRECT_URI field must match one of the “Redirect URIs” in the “Settings” tab of the auth configuration dialog in Plasmic Studio.
You’ll likely want to add both your production and local servers.
Custom auth provider
This guide is for projects that use a custom auth provider. Note that if you use a custom auth provider, you must self-host.
What is this for / when is this needed?
This is needed so long as you want to use the features in Plasmic that depend on knowing who is the currently logged in user.
Specifically:
-
If you want to use the
currentUserto get at their email (or other custom properties). -
If you want to have queries/backend operations that are restricted by role (e.g., only logged-in users, or only Admin roles).
If you don’t need to use these features, you don’t need enable auth at all in your Plasmic project. This is common for website projects, or projects where all data operations are handled outside of Plasmic.
Example repos
You can check out some example repos that show the custom auth in practice by integrating with Supabase Auth:
Configuration
In Plasmic Studio, make sure you have auth enabled first. Then find the “Provider” field in the “Settings” tab, and choose “Custom Auth”.
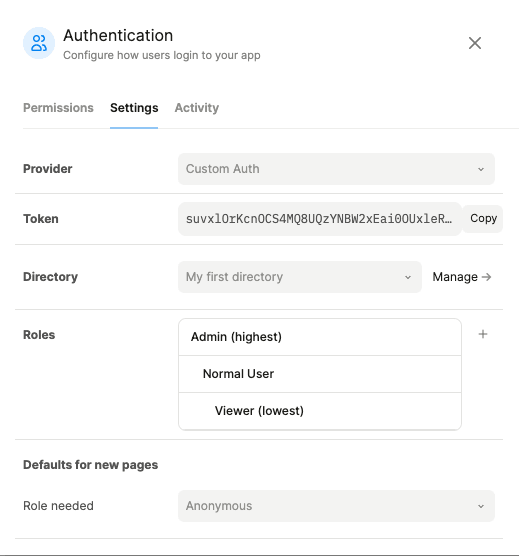
The “Token” field shows your application secret token. This token should only be used on the server and never be exposed to the client.
Installation
Install the @plasmicapp/auth-api package.
npm install @plasmicapp/auth-api# or yarn add @plasmicapp/auth-api
@plasmicapp/auth-api provides a simple API that your server should use to communicate with Plasmic about the user’s authentication status:
ensurePlasmicAppUsershould be called when a user logs in to your application. This function will ensure the existence of Plasmic user that maps to your provider user and return a user token that you can use to authenticate the user in Plasmic.getPlasmicAppUserFromTokenshould be called when a user visits your application. This function will verify the user token and return the Plasmic user associated with the token.
ensurePlasmicAppUser
ensurePlasmicAppUser creates a Plasmic user that’s going to be associated with your application.
If the user already exists, it will return the existing user.
You should call ensurePlasmicAppUser after your user successfully logs in.
The following snippet shows how this function could be used in an auth callback handler:
import { ensurePlasmicAppUser } from '@plasmicapp/auth-api';async function authCallback() {// Logic to handle the callback// After callback handling// ...const result = await ensurePlasmicAppUser({email: 'USER_EMAIL',appSecret: 'YOUR_APP_SECRET'});// The function won't throw an error, but will return an error message insteadif (result.error) {// Error handlingconsole.error(result.error);}const { user: plasmicUser, token: plasmicUserToken } = result;// Store the token in a cookie or session// ...}
The user token returned by this function should be stored in a cookie or session.
The token is valid for 7 days.
After that, you should call ensurePlasmicAppUser again to get a new user token.
getPlasmicAppUserFromToken
Once you have a user token, call getPlasmicAppUserFromToken to exchange the user token for a Plasmic user.
The following snippets show how this function could be used in a Next.js page route with server side rendering:
import { getPlasmicAppUserFromToken } from '@plasmicapp/auth-api';import { PlasmicRootProvider, PlasmicComponent, ComponentRenderData } from '@plasmicapp/loader-nextjs';import { GetServerSideProps } from 'next';import { PLASMIC } from '../plasmic-init';// SSR fetch the data needed to render Plasmic pages or components and the plasmic userexport const getServerSideProps: GetServerSideProps = async (ctx) => {const plasmicData = await PLASMIC.fetchComponentData('Dashboard');if (!plasmicData) {throw new Error('No Plasmic design found');}// Retrieve user token from the cookie or session and call `getPlasmicAppUserFromToken`// `retrievePlasmicUserToken` should be implemented in your application to connect between your auth provider and Plasmic// see the example below for more detailsconst plasmicUserToken = retrievePlasmicUserToken(ctx);const { user: plasmicUser } = await getPlasmicAppUserFromToken({token: plasmicUserToken});return {props: {plasmicData,plasmicUser,plasmicUserToken}};};// Render the page or component from Plasmic.export default function Dashboard(props: {plasmicData: ComponentRenderData;plasmicUser?: any;plasmicUserToken?: string;}) {const compMeta = props.plasmicData.entryCompMetas[0];return (<PlasmicRootProviderloader={PLASMIC}prefetchedData={props.plasmicData}// Pass in the plasmic user and user tokenuser={props.plasmicUser}userAuthToken={props.plasmicUserToken}><PlasmicComponent component={compMeta.displayName} /></PlasmicRootProvider>);}
You can see a complete working example of this approach.