Deploying to multiple environments
This page is only for projects using the Headless API (loader). If you are using codegen, then you should follow the same process you do for code changes.
You may be deploying your app or site to multiple environments — test, staging, production, etc. Here’s how we recommend managing Plasmic in your different environments.
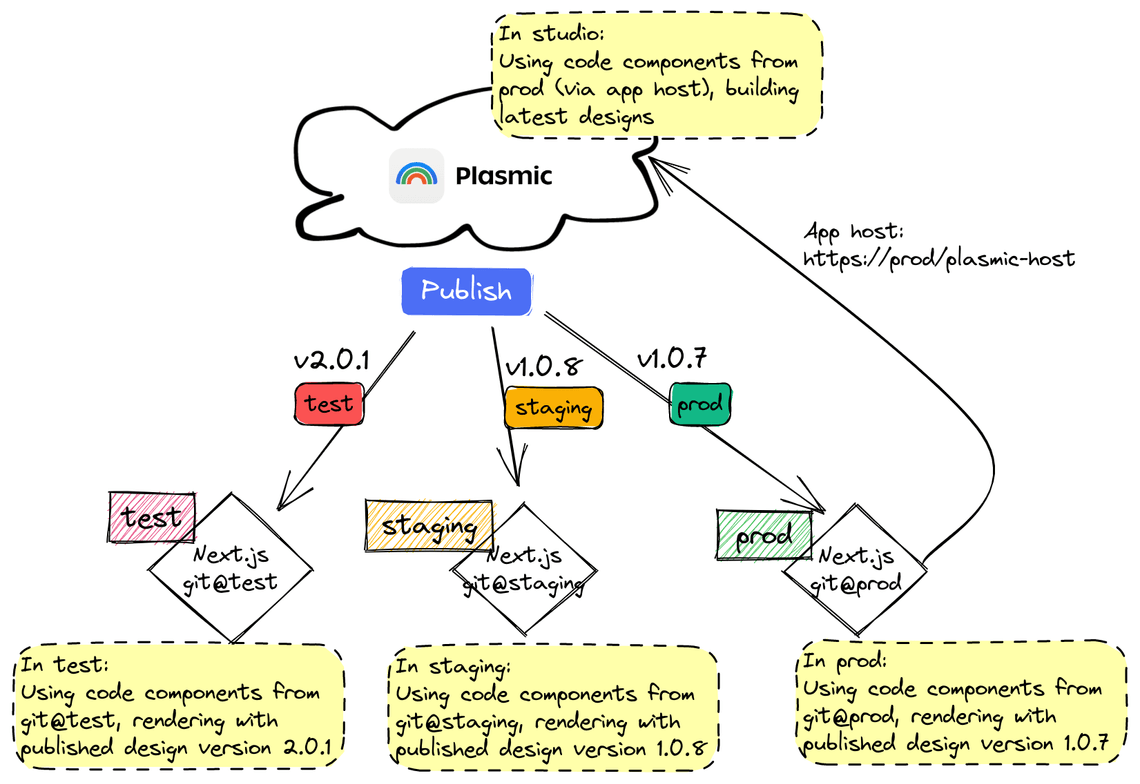
In the above diagram, there are three environments — test, staging, and prod — running three different Next.js apps using different versions of the code. Each environment is using the Plasmic design that was published and tagged for that environment.
Managing your published designs with tags
You can tag your published versions with any number of tags. This makes it possible to tag whether a specific version is ready for different environments.
Adding tags when publishing
When you publish your design, you can now optionally specify tags for this published version:
Using a tagged published version in your app
When you call initPlasmicLoader(), you can then specify the tag you want to use:
export const PLASMIC = initPlasmicLoader({projects: [{id: 'XYZ',token: '123',// use the latest published version tagged with "staging"version: 'staging'}]});
When you specify a tag name as the version you want to use, it will always use the latest published version with that tag. This makes it easy for you to specify different tags to use for your different environments:
export const PLASMIC = initPlasmicLoader({projects: [{id: 'XYZ',token: '123',version:process.env.NODE_ENV === 'production'? 'prod': process.env.NODE_ENV === 'staging'? 'staging': // If not production or staging, then just use the latest// published version, regardless of tagsundefined}]});
Updating tags after publishing
You can add and remove tags to a published version after publishing as well.
For example, once a published version has been vetted in staging and approved for production, you can simply add a “prod” tag to it. Similarly, if you need to rollback a design for production, you can simply remove the “prod” tag from a published version, and the version previously-tagged as “prod” will be used instead.
Rebuilding your site after updating tags
Once you have updated your tags, you’ll want to kick off a rebuild of your site so that it will start using the newly-tagged version.
If you are using Next.js’s incremental static regeneration via revalidate or any other mechanism that automatically rebuilds your site after some timed interval, you’re already set! Your site will simply be using the right version the next time it is rebuilt.
If you need to trigger a rebuild by hitting a webhook instead, then you’ll need to do so manually. You can use the “Publish” button in the upper-right, uncheck “Save a version” and other sections, and only run your “Custom webhooks”. If you have multiple webhooks corresponding to multiple environments, you’ll also want to make sure you pick the right one.
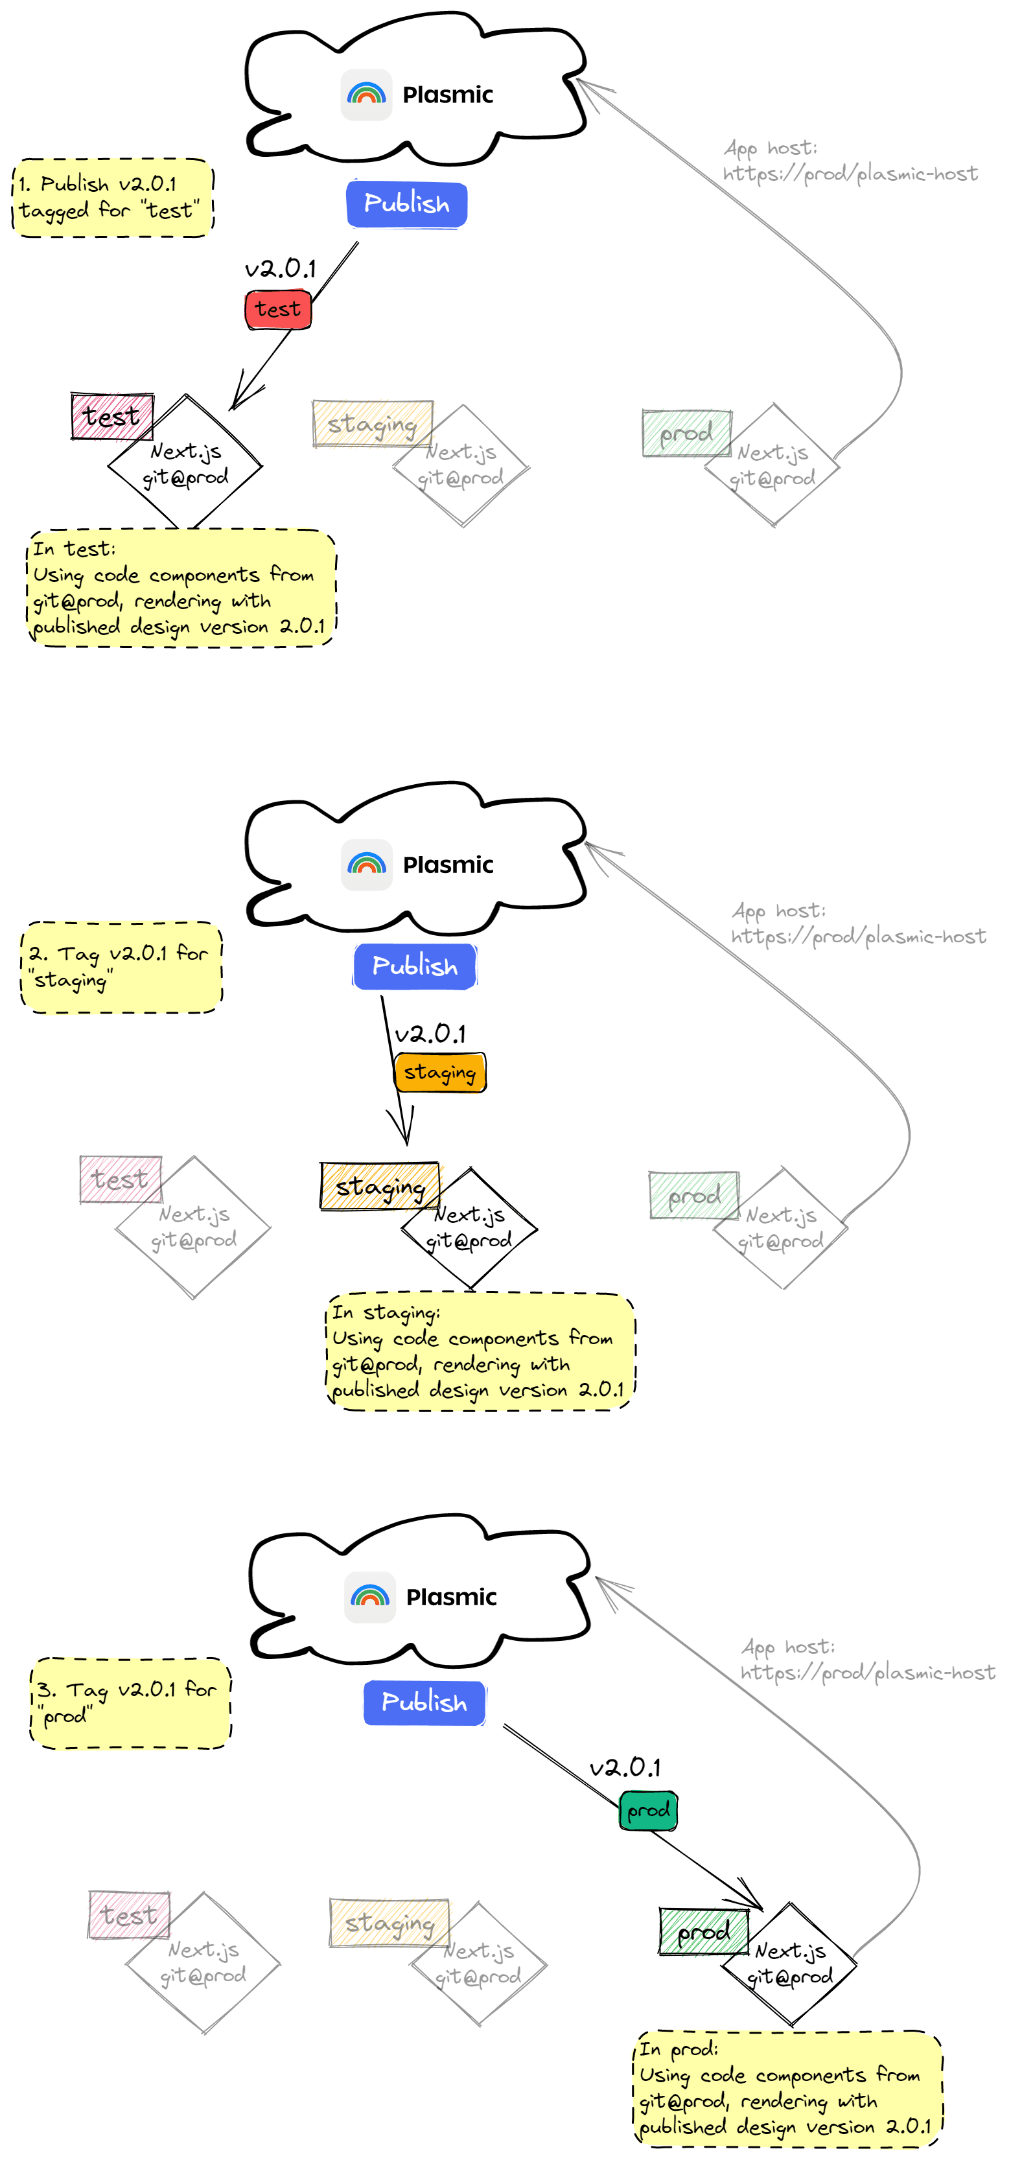
Sample workflow
This sample workflow shows how a new version of Plasmic design may flow through the different environments as it is vetted and approved for production.
- Edit or create new designs or pages in Plasmic.
- When ready, Publish a version of your project. Tag the version as
test. - The Next.js app in the test environment automatically picks up your published version if you are using
revalidate. You can now go to the test environment and test your changes. - When you are ready and confident, you can tag your published version as
staging. - The Next.js app in the staging environment automatically picks up this version. Now people can verify the changes in the staging environment.
- When it is ready for production, tag the version as
prod. The changes will be automatically picked up in the production environment.
Managing your code components and app hosts
One powerful feature of Plasmic is that you can use your custom arbitrary React components in your Plasmic projects by setting up an app host. Your app host provides code components to the Plasmic Studio editor so that they can be used to render the artboards in your project.
If you have multiple deployment environments — from localhost when you’re developing your app or site, to production when everything is ready — then you will end up with multiple app host URLs — from ”http://localhost:3000/plasmic-host” to ”https://www.prod.com/plasmic-host”. Which one should your Plasmic project be pointing to?
First, note that the app host URL you associate with your Plasmic project is only used by the Plasmic Studio editor at design time to register the list of available code components, and to render those code components in the artboards in the editor. Once you publish your Plasmic project, and the published version is consumed by your deployment in different environments, that deployment will be using whatever code components exist in that environment (and not whichever is configured as the app host for the project).
Recommendations
- At the very beginning, set the app host to localhost, as developers are actively working on code components and testing them in the project. While in this mode, only people who are also running a local development server can use the Plasmic Studio editor to edit the project.
- As soon as possible, update the app host to a URL accessible by more people (say, the test environment). That means designers and content creators will be able to iterate and build out designs while using code components that have been deployed to the test environment.
- As the set of code components solidify and get deployed to more stable environments, update the app host until it points at your production environment.
- In the steady state, the app host should be set to the production app host URL. That means when content editors and designers are building new pages, they will be using code components that have been deployed to production.
- It is tempting sometimes to set the app host “back” to point to the earlier environments to start using new code components that are not yet in production. While this is fine, it must be done carefully — you wouldn’t want to publish some Plasmic designs using code components that are not in production yet, and mistakenly deploy those designs to production.
Considerations
- If developers need to build new code components or edit existing code components, they should make a copy of the Plasmic project, and point it to their localhost. They can then test against the copied project. They should not point the primary project to their localhost, as that makes it impossible for anyone else to use the project.
- As developers make changes to code components, they should do so in a backwards-compatible way, because it’s possible that their code components will be deployed to the production environment, but the production environment is still using a version of Plasmic designs that were built with older code components in mind.
- Simplest example — developer removes a component that is currently used in Plasmic designs. If that change gets deployed to production, and the Plasmic designs try to instantiate that component and fails, you may see errors.
- More nuanced example — a code component’s prop type is changed from a boolean to a string. When this code gets deployed to production, the Plasmic designs may still be instantiating this code component with a boolean prop. The component will need to know how to deal with both boolean and string values being passed in.
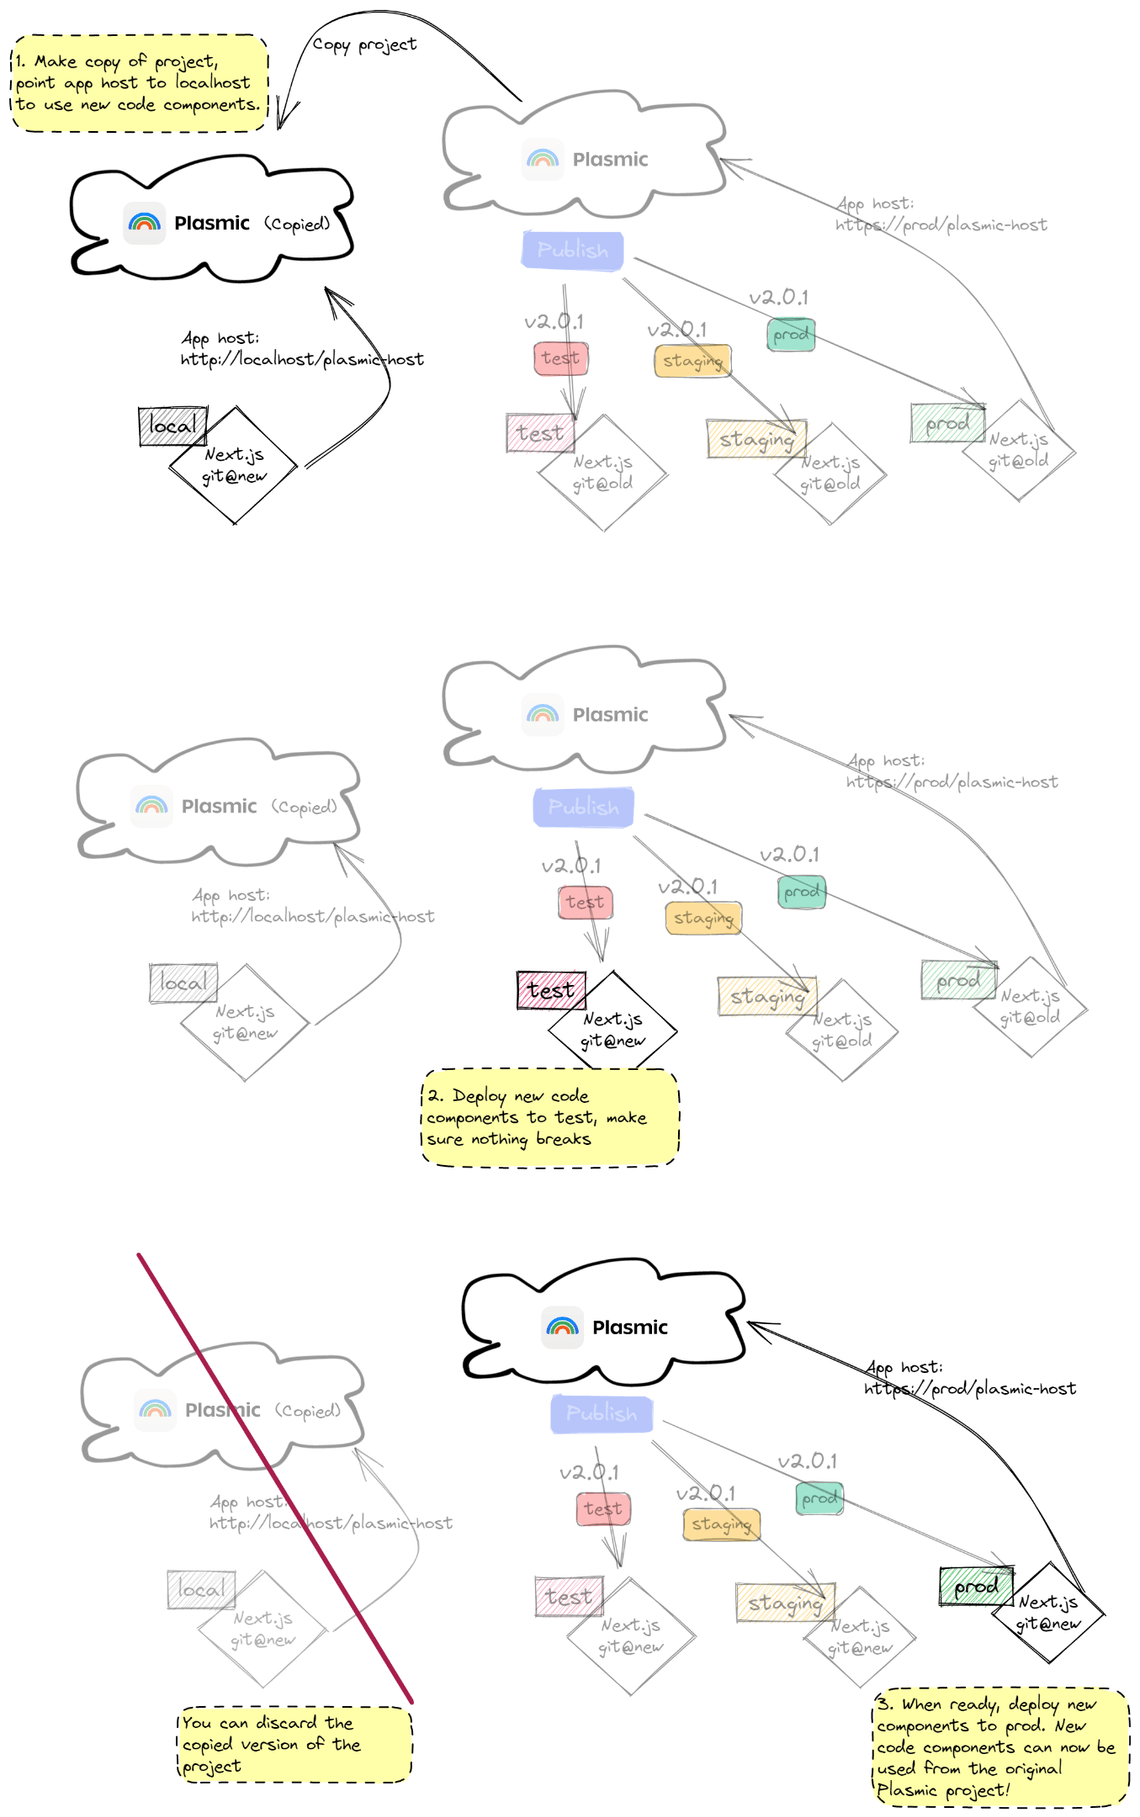
Sample workflow
Here’s an illustration of what happens when you try to make changes to code components:
- Developer starts a local server.
- Developer clones the primary project, and points to the local server as the app host. You should never point the primary project’s app host to localhost, as no one else would be able to open and use that project.
- Developer makes changes to the code, and tests it against the cloned project.
- When ready, developer merges and deploys code through various environments. The code components should be backwards-compatible, as they will be used with Plasmic designs that were published before these code changes.
- Once the code components have been deployed to production, designers and content creators can now use them from the primary Plasmic project.
Note that as new code components are making their way to different environments, you are using the old published Plasmic designs with the new code components. That’s why it’s important to keep your code component changes backwards-compatible.
Managing different data sources with overrides
In Plasmic, you can install different components from our Component Store that allows you to connect to different data sources, like your Shopify, Strapi, or Sanity instances. However, you may want to connect to different external data source instances from different environments.
You can do so by overriding global context props.
Each of the data sources package in the component store has a “Global context” component that specifies the URL endpoint and other credentials like the public token. In Plasmic, you can configure them in the Project Settings tag; the values you put in there will be the credentials that are used to render the artboards, and also the default values used in your application. But you can override the credentials you actually use in your application, like this:
<PlasmicRootProviderglobalContextProps={{// Read the right host/token to use from the// deployment environmentstrapiCredentialsProviderProps: {host: process.env.STRAPI_HOST,apiToken: process.env.STRAPI_TOKEN}}}><PlasmicComponent component="/" /></PlasmicRootProvider>